
|
Improved 3D Preview
The 3D preview has been fully re-rengineered and now performs a better quality and new features, see the picture:
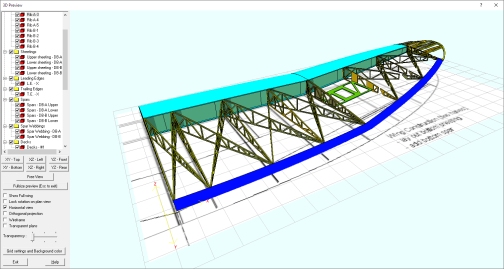
Here a brief list of the main improvements:
- You can now switch on/off every single part or group of them
- The new Views and the option to select Orthogonal projection let you to make measurements on the 3D Preview
- You can apply customisable Grids, for better references
- The option to show also the Full Wing preview (not only the right Half wing) is now available
- Better quality of the rendering, including edges enhancement
|

|
2D Graphic input value procedure
This is a totally new feature.
Let's start from the beginning.
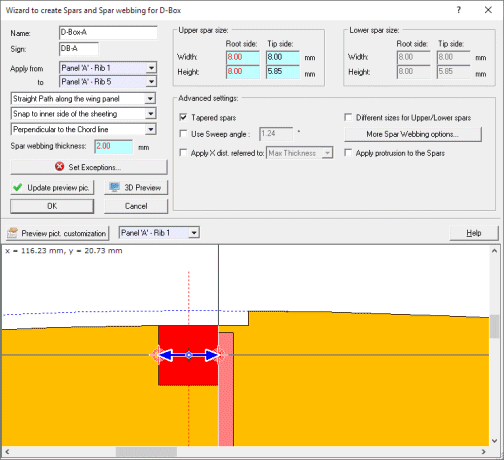
In the upper part of every page of the Project wizard you can see many edit controls, where you can insert parameters and values to define your project. For example, when you are applying a spar, you can define at least the spar size and it's placement. You will do that inserting the right values in the included edit boxes.
With this new technology you can also send values from the 2D Graphic view to the edit boxes in a very simple way.
The edit boxes enabled to get values from the 2D Graphic view have a coloured background, and when they are active in the actual 2D Graphic view page the text is rendered in Red.
Depending on the type of value (coordinate, length/size/distance, angle), the colour of the background is different.
When you set the focus to an edit control enabled to get a value from the 2D Graphic view (we will just call it graphic enabled), you will see in the 2D Graphic view some control points. Just click them and move them to the right position to apply the new value.
After you move the control point to the new position and click there the Left mouse button, the new value will be copied to the edit box and the Update/Modify button automatically pressed, so you can see immediately the final effect of the new value.
See below the example of what you see when you select the Width edit control of a Spar section:
|

|
Fast re-scaling of a project
Another totally new feature.
In the first page of the Project wizard you can now rescale the full projects, applying also
optional granularity to thickness and size values (to better match the dimensions of material
available on the market). Doing that with version 1 required manual adjustments of all
elements, a real nightmare...
See below the picture of the Scaling interface:

|

|
Weight and size calculation of the wing
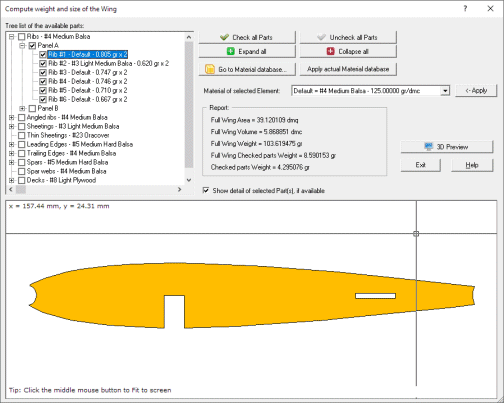
Using this new feature you can compute the Area, Volume and Weight of the wing.
You can apply default or customized materials to every part or group of Parts, then you
will see the weight of the total wing of or some selected parts.
See below the picture of the Weight dialog:
|

|
General settings
Here a brief list of the main improvements related to general settings:
- You can now specify the Dihedral not only referred to the chord line, but also to the upper or lower side of each panel. In this way you no pain to get a straight wing on the upper or lover surface side.
- Remove Wing Tip button. Now you can perform this action just pressing a button.
- New improved Save command in the Expert toolbar. You can select a new name here, for example.
- Faster saving/loading of a project
- Phantom ribs. You can define some ribs as Phantom, just for reference use for example. This Ribs won't be
exported or cut.
|

|
Leading edges
A lot of news in Leading Edges:
- A new LE type: Vertical Strip. This is a (usually) thin part similar to the old Strip type, but placed vertically.
- Creation of parts for Strip and Vertical Strip LE types. In this way you can export and cut them, as already possible in version 1 for Shaped Spars.
- Slots applied to Strip and Vertical Strip types. You can in this way to get a smaller slot in the ribs, and a slot in the LE part.
This will help a lot to get a perfect alignment during the building.
- Automatic and/or manual managements of Lightening holes for Strip and Vertical Strip LE types.
- Possibility to have a straight internal side for the Strip type LE.
- You can now select to apply the x distance referred to the nose considering or not the Sheeting.
|

|
Trailing edges
A lot of news in Trailing Edges as well:
- A new TE type: Vertical Strip. This is a (usually) thin part similar to the old Strip type, but placed vertically.
- Creation of parts for Strip and Vertical Strip LE types. In this way you can export and cut them, as already possible in version 1 for Shaped Spars.
- Slots applied to Strip and Vertical Strip types. You can in this way to get a smaller slot in the ribs, and a slot in the LE part.
This will help a lot to get a perfect alignment during the building.
- Automatic and/or manual managements of Lightening holes for Strip and Vertical Strip TE types.
- Possibility to have a straight internal side for the Strip type TE.
|

|
Sheetings
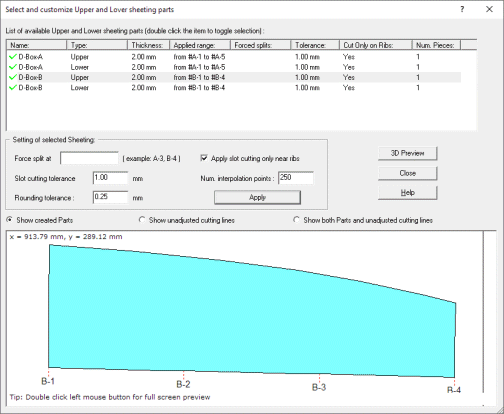
A big piece of news is the possibility to draw & cut the Sheetings, both for the normal and the stripped type.
This is not a trivial feature, as the sheeting elements must be lofted and developed taking care of simple and complex
curvatures. See below the picture of the dialog to check and customize the sheetings:
Version 2 give also the possibility to define thin (virtually zero thickness) sheetings. This option can be used for example
when you want to cut the fabric or film sheetings, or evaluate their weight, without having to specify a very low thickness
and wasting then elaboration time to modify the ribs of about nothing...
|

|
Spars and Spar Wizards
A lot of news in Spars and Spar Wizards:
- A new Spar Wizard D-Box type, where you have no webbing elements, but a Slotted Shaped spar between the usual Upper and Lower Spars
- For all the D-Box types (3 now) you can set the x position referred not only to the Max thickness point, but also the Leading or Trailing edges.
- You can now select to have the D-Box vertical or perpendicular to the Mean line of the airfoil (new). This second possibility will give a better alignment for high cambered airfoil.
- Still about DBox, you can now customize the size of the webbing elements, and select also to have them glued between the Spars and not only on the rear faces.
- Now you can apply automatic or manual lightening holes to Shaped and Slotted spars.
- The slotted spars can now get slots also where crossing Geodetic ribs. You can switch on/off this feature.
- You can select the slot size in slotted spars, taking care in different way of the ribs thickness, when the ribs are not perpendicular to the spar as seen in the wing plan
- New X placement of the spars along the wing plan, you can now specify also a fixed distance from a custom reference point (for example LE, TE and so on)
- Now the protrusion is applied not vertically, but along the perpendicular to the wing surface direction
- Now the slot sizes in the ribs take also care of spar dihedral and sweep angle
|

|
Aileron slots
Now you can define the Sweep angle of the Aileron slot and the reference X point of application.
|

|
Decks
For small angled Decks you have now the possibility to shape the Decks not only rectangular, but also following the natural shape of the Wing panel.
|

|
Geodetic ribs
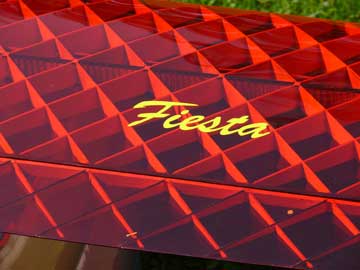
You have now a second Wizard to automatically create a full Geodetic wing, like in the below picture:
|

|
Building tabs
News in Building tabs:
- Improved dialog to customize the single rib
- You can now switch off the rear or front part of the single rib
- You can now apply rear tabs also to Half ribs (this has a sense when the half rib is long enough, or the rear tab will be switched off by default)
|

|
Wing tip
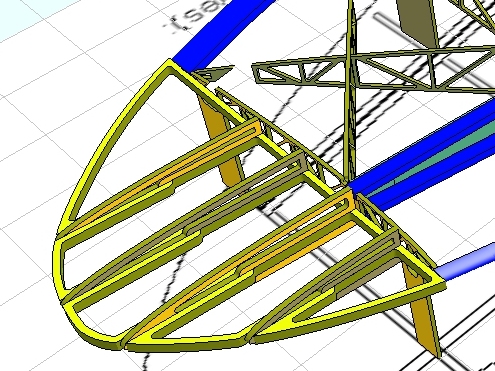
A big piece of news is the possibility to create ribs for the Wing tip, and apply automatic lightening holes to these ribs.
See the example:
|

|
Cam features
New Cam feature for devWing Cam 2:
- 3D Preview and export to STL file of every part. In this way you can the use your 3D printer to create the parts!
- Multiple sheets on a single cutting job. As for example balsa sheets are usually short, you can select to place multiple aligned sheets on the cutting table, and the application (during the nesting phase) will place the parts taking care to cross the joining lines between sheets.
- More customizations features for parts going to be cut. You can change the label, the number of pieces, rotate them and so on...
- Before cutting the parts you can adjust the sense of rotation of the cut for all contours and islands in one shot, to have a better cut according to the rotation sense of your milling tool.
- Improved management of bridges for little islands/holes
- Label engraving performed now before cutting the parts.
|

|
Many others little improvements
Here a brief list of other improvements:
- Faster saving/loading of a project
- Mouse pan in the zoomed 2D preview, just using click and drag. Before the only option was use the scroll bar.
|