|
|
| Back to start page |
 |
|
|
|
AutoTrace elements dialog
|
|
AutoTrace elements dialog
This dialog will be prompted when you use
one of these functions included in the
Startup dialog:
then you select a raster (Gif, Jpeg,
Bmp, Png, Tif, Tga, Pcx) file and the "Selection dialog when a you
import Raster elements..." option included in the Setting
menu of the Startup dialog
is enabled.
Suggestions for a
good raster image:
-
Use a White
backgound and trace the elements in Black. The
greater the color difference between the background and the elements, the
better the process will work!
-
If you are going to cut Parts, them
must be filled with the same colour of the contour.
-
If you are going to cut vectos, them
must be drawn the the same color and not using a too thick line.
-
Bigger resolutions (DPI) will give
better results, but longer processing time. We suggest don't go over 5.000 x
5.000 pixels, also if the application can process larger files
If you follow these suggestions, you have
good chances to have success.
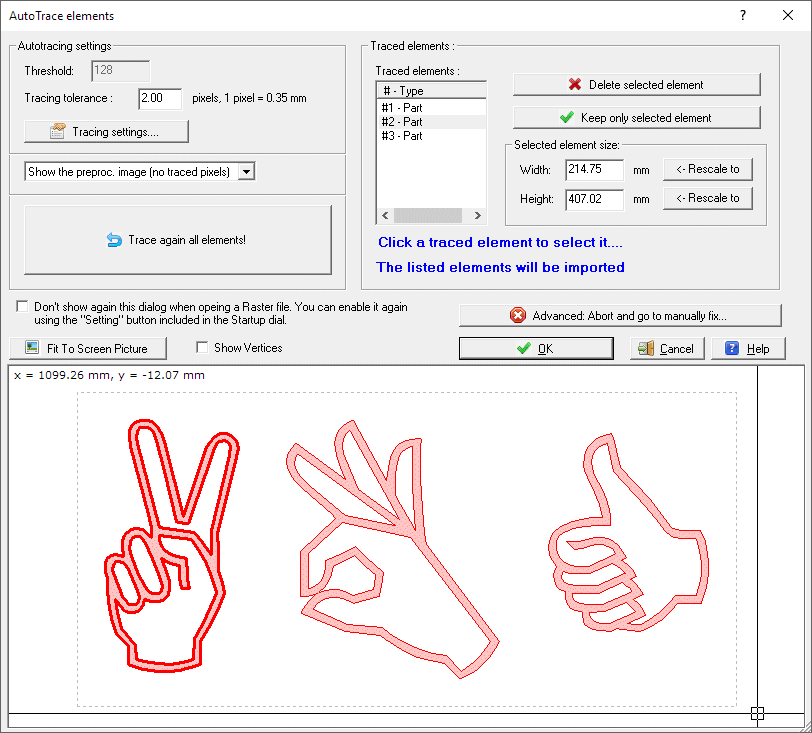
The basic ideas of this dialog are:
Check and select the elements you are
going to cut
You will see the validated Elements in
the list and in the 2D preview.
If the result is different than expected, read below "Note:
If no Elements or bad elements are included you can"
If you see multiple parts, and you want:
-
to select only one of them, we suggest
to click the desired Element (this will select it also in the
Filtered elements list), then press the Keep only selected element
button.
-
to select only some of them, we suggest
to click one by one the unwanted Elements (this will
select it also in the Filtered elements list), then press the Delete
selected element button.
You can go back to all the element
pressing the Tracing again all elements button
If the result is not what you expected,
press the Advanced: Abort and go to manually fix... to open
the actual situation in a Cad document, so that you could fix the problem by
hand.
Change the size of the elements
You can rescale the elements in this
way:
-
click the Element you
want to use as a reference for the size, this will select it also in the
Filtered elements list. Now you can see the actual Width and Height of the
selected Element in the edit controls
-
insert the desired Width or Height,
then press the related <- Rescale To button
Note: the same scale will be applied to
All the elements
You can also select not to display any more this dialog next time, and you see
there also how to enable it again, if you like.
When you finished just press OK to go to the next cutting dialog.
Note: If
no Elements or bad elements are included you can:
-
Try a different Thresold value. Thresold:
as the first internal stage of preprocessing is converting the raster image to
a 2 color image (Black/White), we must specify the value that divide what we
will be considered as White from what will be Black. This is the Thresold
value. Its range goes from 0 to 255. The original pixel values are 0 for Full
Black and 255 for Full White, so generally a good Thresold value could be 128
(the middle value). The application when this dialog starts compute apply a
medium = 128 bvalue, so generally you haven't to take care about it if you
used as suggestes a Black/White image!
Then press the Tracing again all elements
button
-
Retrace or modify the image in
Raster application like Windows Paint, following the Suggestions desribed
just above
If you have a good knowledge about the autotracing world, press the Tracing
settings, the Tracing
settings dialog will be displayed, where you can fine tune the way the
elements are traced.
To debug the Autotracing process, you can use the Show the original image
combo box, you can select one of these views:
-
Show the original image - you see the
original image in Black/Gray and the Traced elements in Red
-
Show the preprocessed image - you see
the preprocessed image in Black/Gray and the Traced elements in Red
-
Show the preproc. image (no traced pixels) -
you see the preprocessed image in Black/Gray, but the already traced
pixels are hidden. And the Traced elements in Red
See also: I have some picture of the parts I want to cut. How can
devFoam help me?
I suggest also to take a look at this page, to
better understand some important concepts of devFoam:
DevFoam FAQ and important concepts